Ball Jointed Doll Makeover

All about my doll makeover, makeup, repaint, ooak, dress, accessories

DIY and Crafts

Simple and easy DIY craft

Beautifull Places

Heaven On Earth! Some Travelling Story, Idea, Review, Tips

Culinary

Yuummm.. everyone love's foods. So here is culinary review from me, and some of super quick and easy recipe

Ball Jointed Doll Makeover

Because I LOVE Doll

Showing posts with label Tutorial. Show all posts

Friday, April 25, 2014

DIY Glitter Bottle

I love to DIY (do it your self) soo much, but I don't have free time to do that. DIY I'm gonna make today is glitter vase from unused jam bottle. The step is very easy, and the material is cheap.

Materials :
1. White glue / wood glue (I'm using fox brand, but you can use any white glue brand)
2. Clean unused jam bootle (or you can use any glass bottle)
3. Plastic container (for mixing)
4. Brush (better if the hair is soft)
5. Glitter (any color,any size you have)
6. Acrylic paint (match with glitter color)

Let's get started..


Step 1 :
Put white glue in plastic container


Step 2 :
Put glitters in the plastic container, its fun to mix few color glitter, the result will be bright and colourfull


Step 3 :
Add a little bit acrylic paint, just to make the glitter color is more visible


Step 4 :
Mix all materials together using a brush


Step 5 :
Paint the glass bottle using brush. At the first time it will look messy. Wait the glue to dry around 30min, and put another layer of glitter paint, repeat few times until all surface covered by the glitter paint.


Step 6 :
Leave it completely dry 1 day, I decorate it with yellow ribbon, but you can decorate it with lace, germs or any creation you like.


This glitter jbottle can be use for vase, makeup brush holder, candy containers, or coins containers.

Thursday, October 10, 2013

Cracked Nail Polish Tutorial

I got a lot of questions about the cracked nail polish, such as "why the results are not cracked?" or "how to put it?" or "the result of cracked nail polish is 2 colors?". So today I will give a tutorial about cracked nail polish.

Coat your nails with regular nail polish as a base. This is the most important step because cracked nail polish will not shatter if you didn't give base polish, this step that people frequently skip.  

Wait until nail polish base 100% dry, then apply cracked nail polish on top of it.
 

I give base white color because white is a universal color.


I use a BK cracked nail polish, because this nail polish is cheap and the result is good


After the base nail polish 100% dry on your nail, apply cracked nail polish on top of it. Directions brushes can go anywhere, horizontal, vertical or oblique. But I think the best results if applied horizontally.
 

Just apply 1 times, don't stacked repeatedly.


Once the nails are covered with cracked nail polish, wait a moment.. the color began to crack. If it is already 100% dry, you can give a layer of top coat to make it more long lasting.


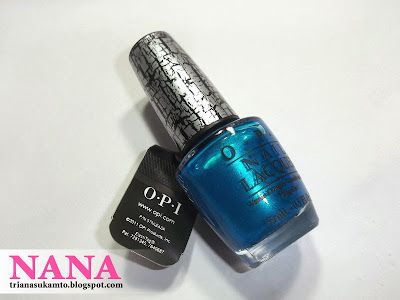
I also tried famous brand cracked nail polish, which is OPI Turquoise Shatter. The directions are same with the tutorial above. You also have to give a layer of base nail polish on your nails.


Apply the OPI Turquoise Shatter nail polish  on your nails that already given a layer of base color, apply to the entire surface of the nails (apply 1 time only, don't stacked it)


OPI Turquoise Shatter result is slightly different from BK cracked nail polish, the cracking is smaller. But for direction for use it, all the cracked nail polish is same.


Friday, August 30, 2013

Hello Kitty Sticker Nail Art Tutorial - Zero Fail

This is the easiest nail art that you can make at home. A lot of girls want their nails looks beautiful, but do not know how to do nail art. Tutorials I start from the simplest, which is nail art sticker.

 Materials needed:
1. Pink Nail Polish
2. Clear Nail Polish (Top Coat)
3. Two Way Pen White
4. Hello Kitty Stickers
5. Fake Nail (These materials may not be used if the nail art done in your original nails)
6. Wood Stick (These materials may not be used if the nail art done in your original nails)
(all materials can be purchased at MY SHOP)

 1. The first step, polishes your nail with Pink Nail Polish, wait until it is completely dry. Once dry, decorate with polka-dot motif using white two way pen (too bad I forgot to photo this section).

 2. Take the sticker by using the needle slowly, it will be zero fail. Stickers will not be damaged when taken.

3. Stick it to the nail appropriate your creations, seal with clear nail polish or top coat, done ^^

Saturday, August 17, 2013

Wood Stick & Practice Finger Tutorial

I receive so many questions from customers about how to use the wood stick, how to use the practice finger and convenient way to decorate a fake nail. So, today is my first nail art tutorial,

1. Wood Stick
Let's start with how to use a wood stick in the fake nail decorating. The tools you need are: wood sticks, double-sided tape, and scissors.

It's easy, just cut double-sided tape with scissors, put it into the wood stick, then put the fake nails that you want to decorate.

2. Practice finger
Tools required is practice nail, double-sided tape and scissors. Practice nail is a best seller nail art tool in my shop, so the questions about practice nail is also quite a lot.

Actually it's similar to wood stick tutorial above, cut the double-sided tape, put it into practice finger, and then put the fake nails that you want to decorate.

The most convenient way to decorate fake nails is.. I think with a wood stick, due to the small size of the wood stick, it that can adapt to various size of fake nails you will use.

Twitter Delicious Facebook Digg Stumbleupon Favorites More